はじめに
Gatsby.jsで作成している本ブログにGoogle AdSenseを導入します。
参考文献
→GatsbyサイトにGoogle AdSenseを導入する方法のサイトが無ければ不可能でした。ありがとうございます。
Google AdSenseにサイトを登録
この手順はWordPressなど他のブログでも同じなので、割愛します。
外部サイトですが、貼っておきます。
→【初心者向け】Googleアドセンスとは?仕組みや稼ぎ方、登録方法を解説! | 初心者のためのブログ始め方講座
Google AdSenseのheader用コードを確認
GoogleAdSense管理画面にログインします。
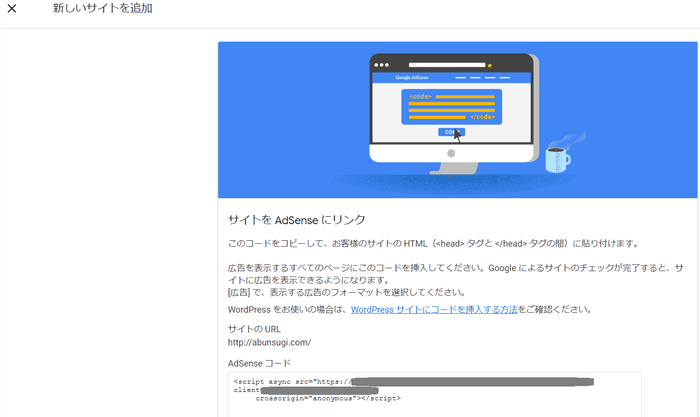
headに入れるコードを確認します。以下のようなコードが取得できるはずです。
<script async src="XXXXXXXXXXXX"
     crossorigin="anonymous"></script>
以下のような画面からコードを生成できます。
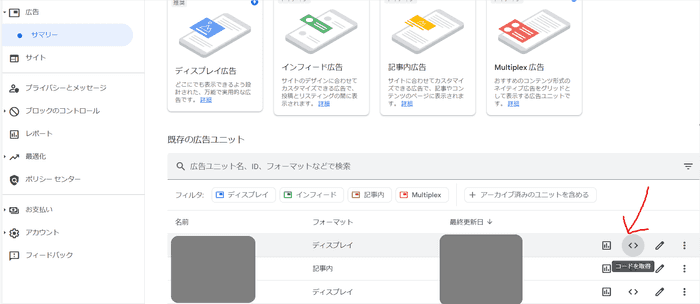
審査後の場合は、広告作成画面から、「コードを取得」を選んで出てくるコードの、上部にある<script>タグが対象となります。
header用コードをGatsbyに設定
Gatsbyの公式チュートリアルを参考にして、直接HTMLに<head>タグを追加します。
html.jsをコピーします。
$ cp .cache/default-html.js src/html.jssrc/html.jsに、先ほど確認したコードを追加します。
export default function HTML(props) {
  return (
    <html {...props.htmlAttributes}>
      <head>
        <meta charSet="utf-8" />
        <meta httpEquiv="x-ua-compatible" content="ie=edge" />
        <meta
          name="viewport"
          content="width=device-width, initial-scale=1, shrink-to-fit=no"
        />
        {props.headComponents}
        <script          async          src="XXXXXXXX"          crossOrigin="anonymous"        ></script>      </head>
      <body {...props.bodyAttributes}>
      // 省略
公式チュートリアルに
カスタマイズ
html.jsは、gatsby-ssr.jsで適切な API を使用できない場合の回避策です。
との記載があるとおり、htmls.jsを触ることは基本的に推奨されません。
その点を認識したうえで色々試した結果、他の方法がうまくいかず、最終的にこの形となっています。うまくいかなかった方法は記事の最後に示します。
GoogleAdSenseの審査に出す
この部分もWordPressなどと同じなので割愛します。
参考→【2022年版】Googleアドセンス審査の合格ポイント!申請方法を詳しく解説 | 初心者のためのブログ始め方講座
さらっと飛ばしますが、実際はここで2か月くらい止まっています。5~6回目で合格しました。
広告用コンポーネントを作成する
コンポーネントを作成して、好きな場所に広告を置けるようにします。 例として記事内の広告を作ってみます。
コードの確認
Google AdSense管理画面からコードを確認します。
<script async src="XXXXXX"
     crossorigin="anonymous"></script>
<ins class="adsbygoogle"
     style="display:block; text-align:center;"
     data-ad-layout="in-article"
     data-ad-format="fluid"
     data-ad-client="XXXXXXXXXX"
     data-ad-slot="YYYYYYYY"></ins>
<script>
     (adsbygoogle = window.adsbygoogle || []).push({});
</script>初めの2行の<script>タグは、すでに<head>に入れているので無視してOKです。
残りの部分をGatsbyで実装します。
コンポーネント作成
私は装飾にChakraUIを使っているので、以下コードに<Box>というタグが入っていますが、無くても問題ありません。
max-widthやmarginを指定する装飾用で、<div>タグの代わりです。
// 記事内広告
import { Box } from "@chakra-ui/react"
import React, { useEffect } from "react"

export const AdsenseInArticle = (props) => {
  const { currentPath } = props

  useEffect(() => {
    if (window) {
      window.adsbygoogle = window.adsbygoogle || []
      window.adsbygoogle.push({})
    }
  }, [currentPath])

  return (
    <Box bgColor="gray.100" maxW="90%" my="2em">
      <ins
        className="adsbygoogle"
        style={{ display: "block", textAlign: "center" }}
        data-ad-layout="in-article"
        data-ad-client="XXXXXXXXXX" // 自サイトのコードに置き換える
        data-ad-slot="YYYYYYYY" // 自サイトのスロットに置き換える
        data-ad-format="fluid" // 自由
        data-full-width-responsive="true" // 自由
      />
    </Box>
  )
}<ins>タグはHTMLとしてほぼサンプル通りです。
以下のコードではwindow.adsbygoogleに空のオブジェクトを追加しているようなのですが、JavaScriptに疎くていまいち理解できていません。。
 useEffect(() => {
    if (window) {
      window.adsbygoogle = window.adsbygoogle || []
      window.adsbygoogle.push({})
    }
}, [currentPath])<haeder>に入れた、外部のスクリプトにより、window.adsbygoogleオブジェクトが生成されているようです。それに対して何かしてるのだと思います。
コンポーネント設置
記事の動的生成をするコンポーネントに、広告用コンポーネントを追加します。
今回は記事内広告なので、マークダウンファイルでコンポーネントを呼び出せるよう、<MDXProvider>のpropsにコンポーネントを追加します。
import * as React from "react"
import { Link, graphql } from "gatsby"
import { MDXRenderer } from "gatsby-plugin-mdx"
import { MDXProvider } from "@mdx-js/react"import { AdsenseInArticle } from "../components/adsense/adsense-in-article"
const BlogPost = (props) => {
  // 省略

  const shortcodes = {
    AdsenseInArticle,  }

  const components = { ...shortcodes}

  return (
    // 省略
      <MDXProvider components={components}>        // 省略
        <MDXRenderer>{post.body}</MDXRenderer>
      </MDXProvider>
  )
}

export default BlogPost
マークダウンの中では、以下のように書けばOKです。
上下1行以上開けないと、おかしくなることがあります。
## てすと

ここに広告

<AdsenseInArticle />
私の環境ですと、gatsby developだと広告が出ないです。最終的には公開してから広告が出ることを確認しています。
ads.txtの設置
AdSense側から、ads.txtの設置をおすすめされるので、ダウンロードしてきて、static/ads.txtに設置します。
公開した時に、XXXXXXX.com/ads.txtのような場所にテキストファイルがおかれていることが確認できれば成功です。
adx.txtとは、自分のサイトに第三者が勝手に広告を貼って、収益を持っていってしまうことを防ぐための仕組みです。
→参考文献:話題の「ads.txt」とは?設置方法やアドセンスの仕組みを解説 | Web担当者Forum
うまくいかなかった方法
<head>にコードを追加する方法はいくつかありますが、以下の方法はどれもうまくいかずに諦めました。メモとして残しておきます。
react-helmetを使う
想定通りのタグが入りませんでした。(これでも問題ない可能性はあります)
入ったタグ
<script async="true" src="XXXXX" crossorigin="anonymous" data-react-helmet="true" data-checked-head="true"></script>入れたいタグ
<script async src="XXXXX" crossorigin="anonymous"></script>プラグイン(gatsby-plugin-google-adsense)を使う
$ npm install @isamrish/gatsby-plugin-google-adsenseでインストールしようとしたところ、エラーが発生し断念。
エラーが発生
npm ERR! code ERESOLVE
npm ERR! ERESOLVE unable to resolve dependency tree
npm ERR!
npm ERR! While resolving: gatsby-starter-blog@0.1.0
npm ERR! Found: gatsby@4.11.2
npm ERR! node_modules/gatsby
npm ERR!   gatsby@"^4.6.0" from the root project
npm ERR!
npm ERR! Could not resolve dependency:
npm ERR! peer gatsby@"^2.13.50" from @isamrish/gatsby-plugin-google-adsense@1.2.0
npm ERR! node_modules/@isamrish/gatsby-plugin-google-adsense
npm ERR!   @isamrish/gatsby-plugin-google-adsense@"*" from the root project
npm ERR!
npm ERR! Fix the upstream dependency conflict, or retry
npm ERR! this command with --force, or --legacy-peer-deps
npm ERR! to accept an incorrect (and potentially broken) dependency resolution.
npm ERR!
npm ERR! See /home/vagrant/.npm/eresolve-report.txt for a full report.

npm ERR! A complete log of this run can be found in:
npm ERR!     /home/vagrant/.npm/_logs/2022-04-09T13_42_50_272Z-debug-0.log
おわりに
Google AdSenseを設置することができました。 自分の成長用ブログなので収益は目的にしていませんが、Web広告の仕組みも勉強できるので、しばらくは貼っておこうと思っています。


